The basics of using the Pool to open and view images and label fields

I've spent a good portion of my PhD working with 3D images in the program Avizo, which is essentially the same as the program Amira. This involved a steep learning curve and a lot of problem solving in the beginning. I've decided to write about the problems I've encountered and how I dealt with them in the hope that this may help the next person learning to use Avizo or Amira do so a bit faster, and with less frustration along the way. These problems will look trivial to the regular or advanced Amira/Avizo user, but they were quite frustrating at the time! These posts assume the reader's familiar with sections 2.1-2.5 of the Amira user's guide, which cover how to load, view and segment an image. My introductory post on this topic is here.

Figuring out how the basics of how the "Pool" (in Amira) or the "Project View" (in Avizo) works can be a bit tricky, and it's one of the first things you have to figure out to use these programs. The Pool is where all the data and modules you're working with are visualised. Here's how the Amira User Manual describes the Pool and its contents:

"Amira is a modular and object-oriented software system. Its basic system components are modules and data objects. Modules are used to visualize data objects or to perform some computational operations on them. The components are represented by little icons in the Pool. Icons are connected by lines indicating processing dependencies between the components, i.e., which modules are to be applied to which data objects." - Amira User Manual, page 4

This is basic stuff, but if you're new to Amira/Avizo, confusion arises because nowhere does the manual tell you what any of this stuff looks like. Here's what it looks like in Avizo, and it looks pretty much the same as this in Amira:

Screen Shot 2015-01-07 at 3.08.25 pm.png

So data objects and modules are colourful blobs, connections between data objects and modules are blue lines, and if you look closely, you can see that the data object-end of the blue line is a diamond while the module-end of the blue line is a square. 

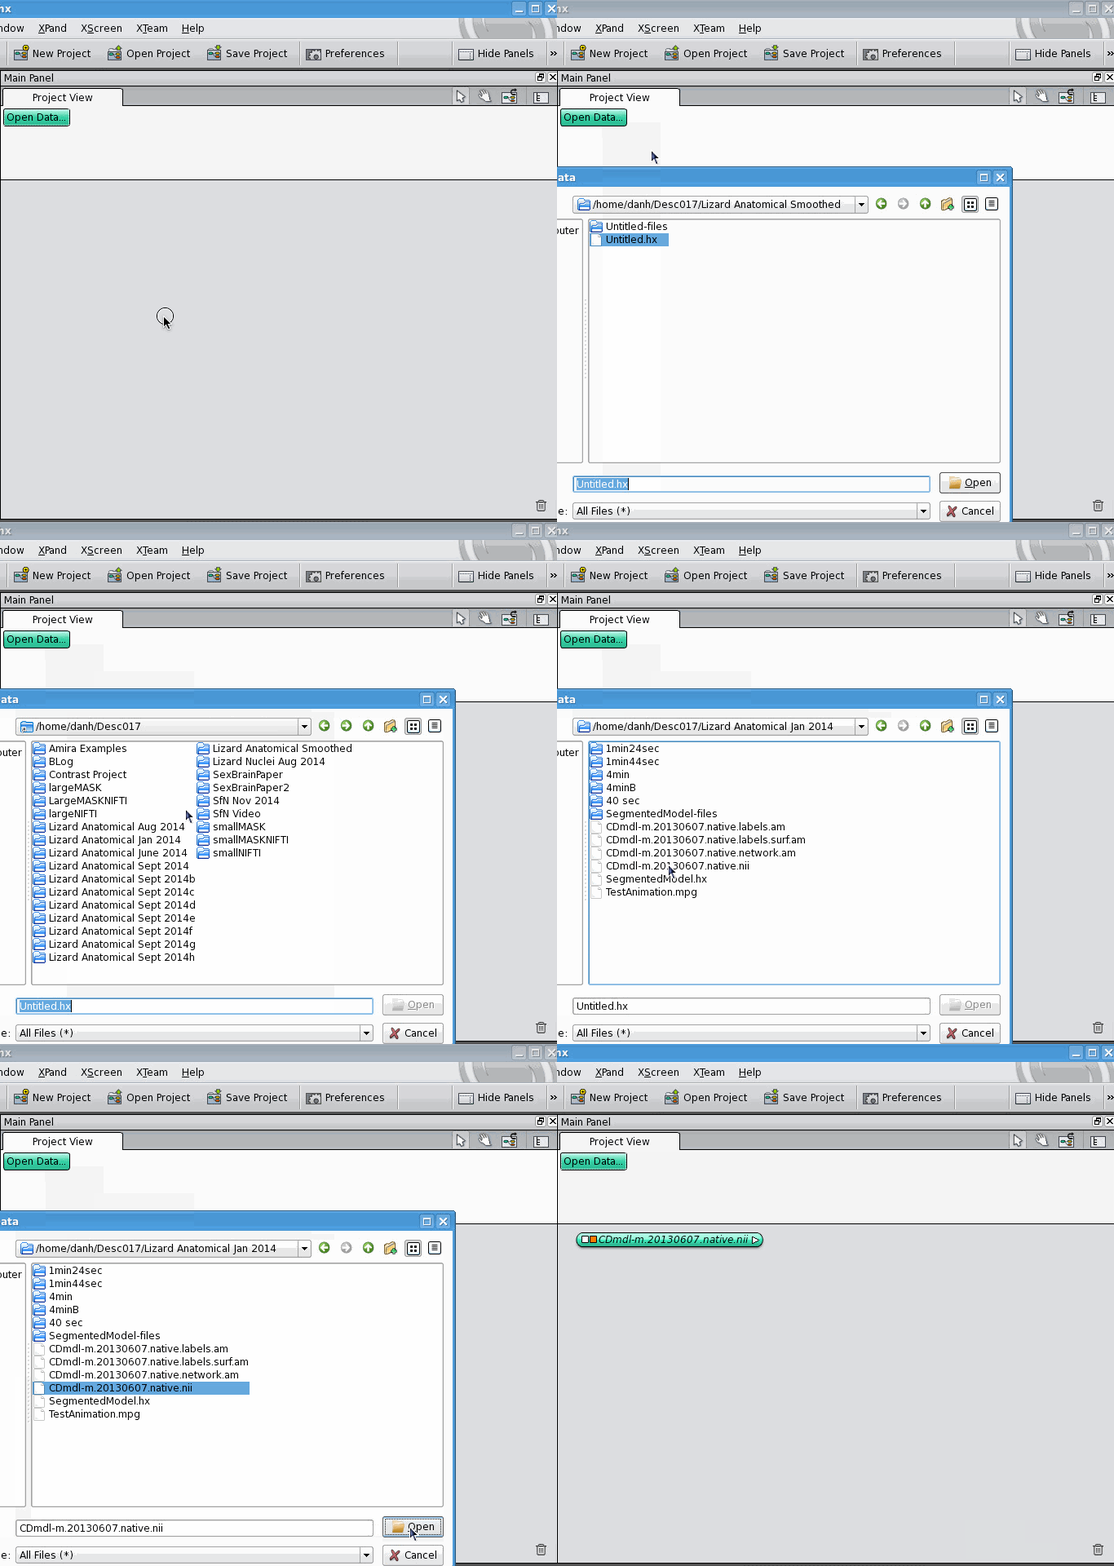
The Amira User Manual explains very well how to make a new label field for an image, and how to save the whole thing (image + label field) together as a "project". But what if you have an image and a label field already, and would like to join them? The Amira User Manual, as far as I can tell, doesn't cover this. Here's how to connect two data objects, one of which is a 3D image and the other is a label field. First, open the 3D image:

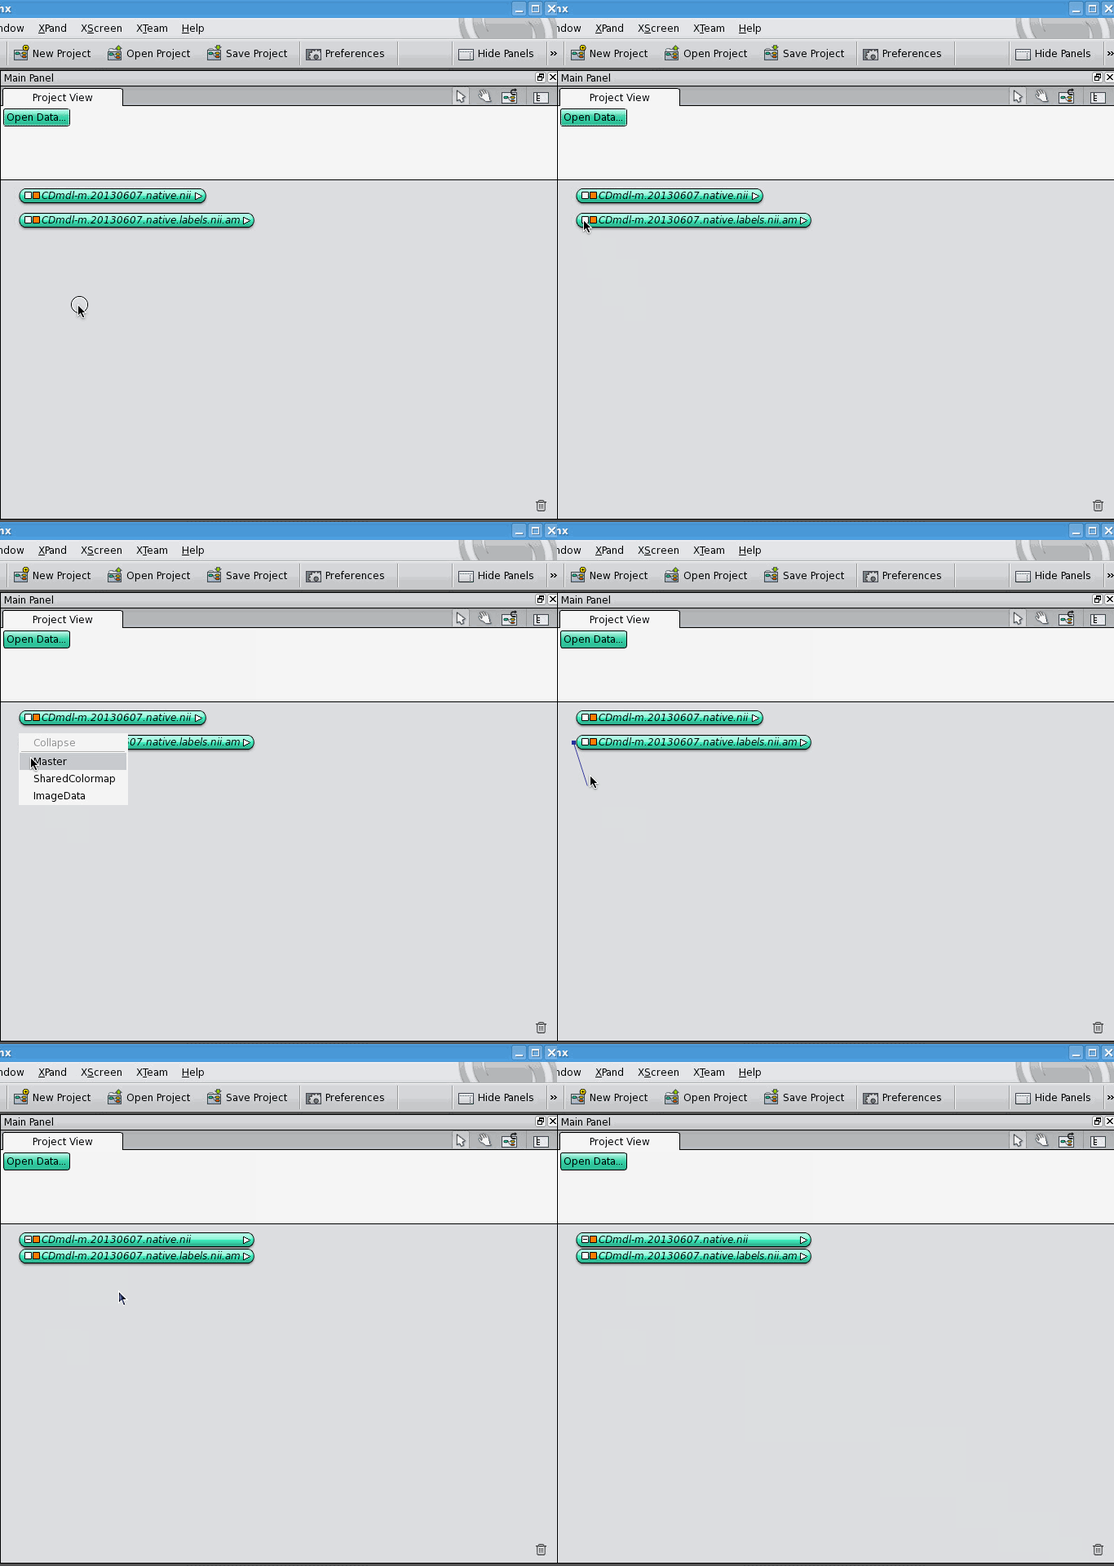
Then, open the label field:

The data object for the label field appears below the data object for the 3D image, unconnected. Now, click on the white square of the label field's data object, which allows you to control what it's connected to. It gives you a drop-down list of different kinds of connections it can make, select the "ImageData" option. A blue connection line follows your cursor around, click on the 3D image's data object. The two data objects jump together, indicating that they are now connected. Notice that connections between data objects are displayed differently than connections between a data object and a module.

All this is well and good, but if you've done this, you've noticed that none of this results in you actually visualising anything. Fortunately, the Amira User Manual is very good at explaining how to visualise your data, in general. However, one thing that I think is missing from the manual is how to visualise a label field and the image it's based on at the same time. For this, there's Colorwash, section 2.8.3 in the Amira User Manual. Colorwash is described in the manual as being for the visualisation of two images at once, but it's not clear from their description that it can be used to visualise a label field on top of an image. Technically a label field is just an image dataset like any other, so Colorwash can be used like this. Attach a OrthoSlice module to the 3D image data object, then attach a Colourwash module to the OrthoSlice module. Click on the white box in the Colourwash module, select "Data" from the drop-down list, and click on the label field data object. Notice that connections between modules are displayed the same way as connections between data objects.

There! Quick and easy ways to load and visualise images and their label fields.

Here are some photos of a very cool lizard

One of Australia's most famous and charismatic animals is the thorny devil (Moloch horridus). It's famous because it looks cool, and because it's not all that easy to find. It's also the only member of the amphibolurine agamids that isn't referred to as a dragon. Although... dragon... devil... I can see a theme here. 

I found my first thorny devil in 2005, when I was an 18-year-old backpacking around Australia. It was crouched down on the Barkly Highway as we were driving between Camooweal and the Northern Territory border. My travel companion - the owner and driver of the car - was getting annoyed at me because I kept yelling for him to stop for animals, and by the time we stopped the animal would be gone (this is a frequent problem when driving at 110 km/hr). I promised him that this time the animal would still be there, and thankfully he stopped. I was so overjoyed I even went to the trouble of taking a picture of it. Here it is:

I am not a photographer. There are better pictures coming.

Not that you can tell from that picture, but the thorny devil is a really weird, unique, beautiful lizard.  Better views of thorny devils can be had by looking at Angus Kennedy's pictures from my 2012 field season. While Angus and Mitch were helping me catch dragons in the Northern Territory and South Australia we came across three thorny devils.

This is the standard thorny devil pose that appears in pretty much all books about Australian reptiles and wildlife. Thurlga Station, South Australia, 2012. Photo by Angus Kennedy.

The thorny devil lives in Australia's more foreboding habitat, the dry, arid interior, where water is a valuable commodity. Its scales are specially designed so that, when any part of the lizard comes in contact with water, that water is funnelled to its mouth through capillary action, the same process that gets water from the roots to the leaves of trees. This was such an incredible discovery that its original description was published in Nature, one of the most important scientific journals. Subsequently, it has been a continuing area of interest for biologists.

A thorny devil at the entrance to an ant's nest. Thurlga Station, South Australia, 2012. Photo by Angus Kennedy.

Other than the water-funnelling thing, there's not much known about thorny devils. A Google Scholar search for their scientific name turns up only thirty two results, many of which are observations of their basic natural history. They're famous for eating ants, and this paper has an adorable picture of one in "characteristic feeding posture" eating ants off the side of a tree. That so little is know about such a famous and charismatic animal is alarming; I can't even find population estimates for them.

Unlike most dragons, the thorny devil ambles slowly. Thurlga Station, South Australia, 2012. Photo by Angus Kennedy.

An additional theme I can see in the limited literature is that thorny devils are slow. In fact, in one of the most hilarious titles to a scientific paper I've ever seen, this article asks "is the devil a sloth?" Although we all know what the authors mean, and scientists are not without a sense of humour (well, most of us, anyway), sloths are, in fact, animals (mammals of the order Pilosa) and thorny devils are definitely not sloths.

Thorny devils have a weird protuberance coming out of the back of their neck. Thurlga Station, South Australia, 2012. Photo by Angus Kennedy.

There's a weird lump coming out the back of the thorny devil's neck. I've heard it said that this is a false head, and that if a thorny devil feels threatened it'll crouch down and stick up its false head for sacrifice to the predator. I can't find any evidence for this in the literature. It is true that, when threatened, the thorny devil will crouch down and arch it back, but this is standard posture for animals that have spiky backs: it presents the predator with their least palatable body part. This behaviour can be seen spike-backed creatures like porcupines, hedgehogs, echidnas, lion fish, armadillo lizards and those horrible spiky caterpillars that curl up in a ball when you touch them. Furthermore, at an extremely informal poll at last year's meeting of Australian herpetologists, I couldn't find anyone who's ever seen a thorny devil without that weird lump. Geckos and skinks, which wiggle their tails to fool predators, are frequently found without tails, and have even evolved a mechanism for automatically detaching their tails and growing new ones. Not that I'm saying the false-head explanation isn't true, but just that I haven't heard of any convincing evidence. If you know of any evidence for the use of the weird lump, I'd be curious to hear it.

Thorny devils are spectacularly coloured and patterned. Thurlga Station, South Australia, 2012. Photo by Angus Kennedy.

Thorny devils are a good example of disruptive colouration. Their colours are the same colours as arid Australia, and they are patterned in such a way that it's hard to make out the shape of the lizard, especially if it's against a complex background. Of course, in these pictures, where we've deliberately placed the lizard against the homogenous backdrop of a dirt road, and it's easy to see.

Thorny devils are the opposite of dolphins: they always look grumpy. Thurlga Station, South Australia, 2012. Photo by Angus Kennedy.

One paper, that I admit is not the most convincing, suggests another adaptation that thorny devils have to their arid home: they may pee on their eggs to keep the eggs moist.

Such a cool lizard! Thurlga Station, South Australia, 2012. Photo by Angus Kennedy.

I thought I'd end with a picture I found online. Thorny devils are quite dramatic looking, especially head-on, but I've never seen them look quite as terrifying as in this artificially-coloured image of a thorny devil skull overlayed onto an image of its head, taken from this website.

The thorny devil at its most terrifying, courtesy of digimorph.org.

The thorny devil at its most terrifying, courtesy of digimorph.org.

Calendars by Tobias

Tobias Hayashi, phenomenal photographer and lizard-catcher, has made 2015 calendars using his pictures! He's made two, one featuring pictures of Australian orchids (which I purchase for myself, just to be unpredictable) and one featuring Australian wildlife. The Australian wildlife calendar features, on its cover, this picture of a Mallee military dragon (Ctenophorus fordi) from while Tobias was working with me in the field in South Australia.

So, if you're expecting a gift from me this Christmas, now you know what to expect! If you're not expecting a gift from me, you can always buy a calendar from Tobias.

Some additional comments on segmentation & hot keys

I've spent a good portion of my PhD working with 3D images in the program Avizo, which is essentially the same as the program Amira. This involved a steep learning curve and a lot of problem solving in the beginning. I've decided to write about the problems I've encountered and how I dealt with them in the hope that this may help the next person learning to use Avizo or Amira do so a bit faster, and with less frustration along the way. These problems will look trivial to the regular or advanced Amira/Avizo user, but they were quite frustrating at the time! These posts assume the reader's familiar with sections 2.1-2.5 of the Amira user's guide, which cover how to load, view and segment an image. My introductory post on this topic is here.

In this post I'm going to talk about some additional issues with the hot keys and with adding and subtracting to materials in the Image Segmentation Editor.

An additional hot key.

Here is a list I downloaded of the hot keys that you can use with the Image Segmentation Editor to really speed up segmentation. I've discussed them previously. There's one omission to the list (that I've found, anyway). Keys 1-9 cover the different tools, starting with the Brush tool, but what about the Pick & Move tool? Turns out, even though it's not on the list, "0" switches ("toggles") you to the Pick & Move tool! I've updated my list accordingly.

The add and subtract hot keys are finicky

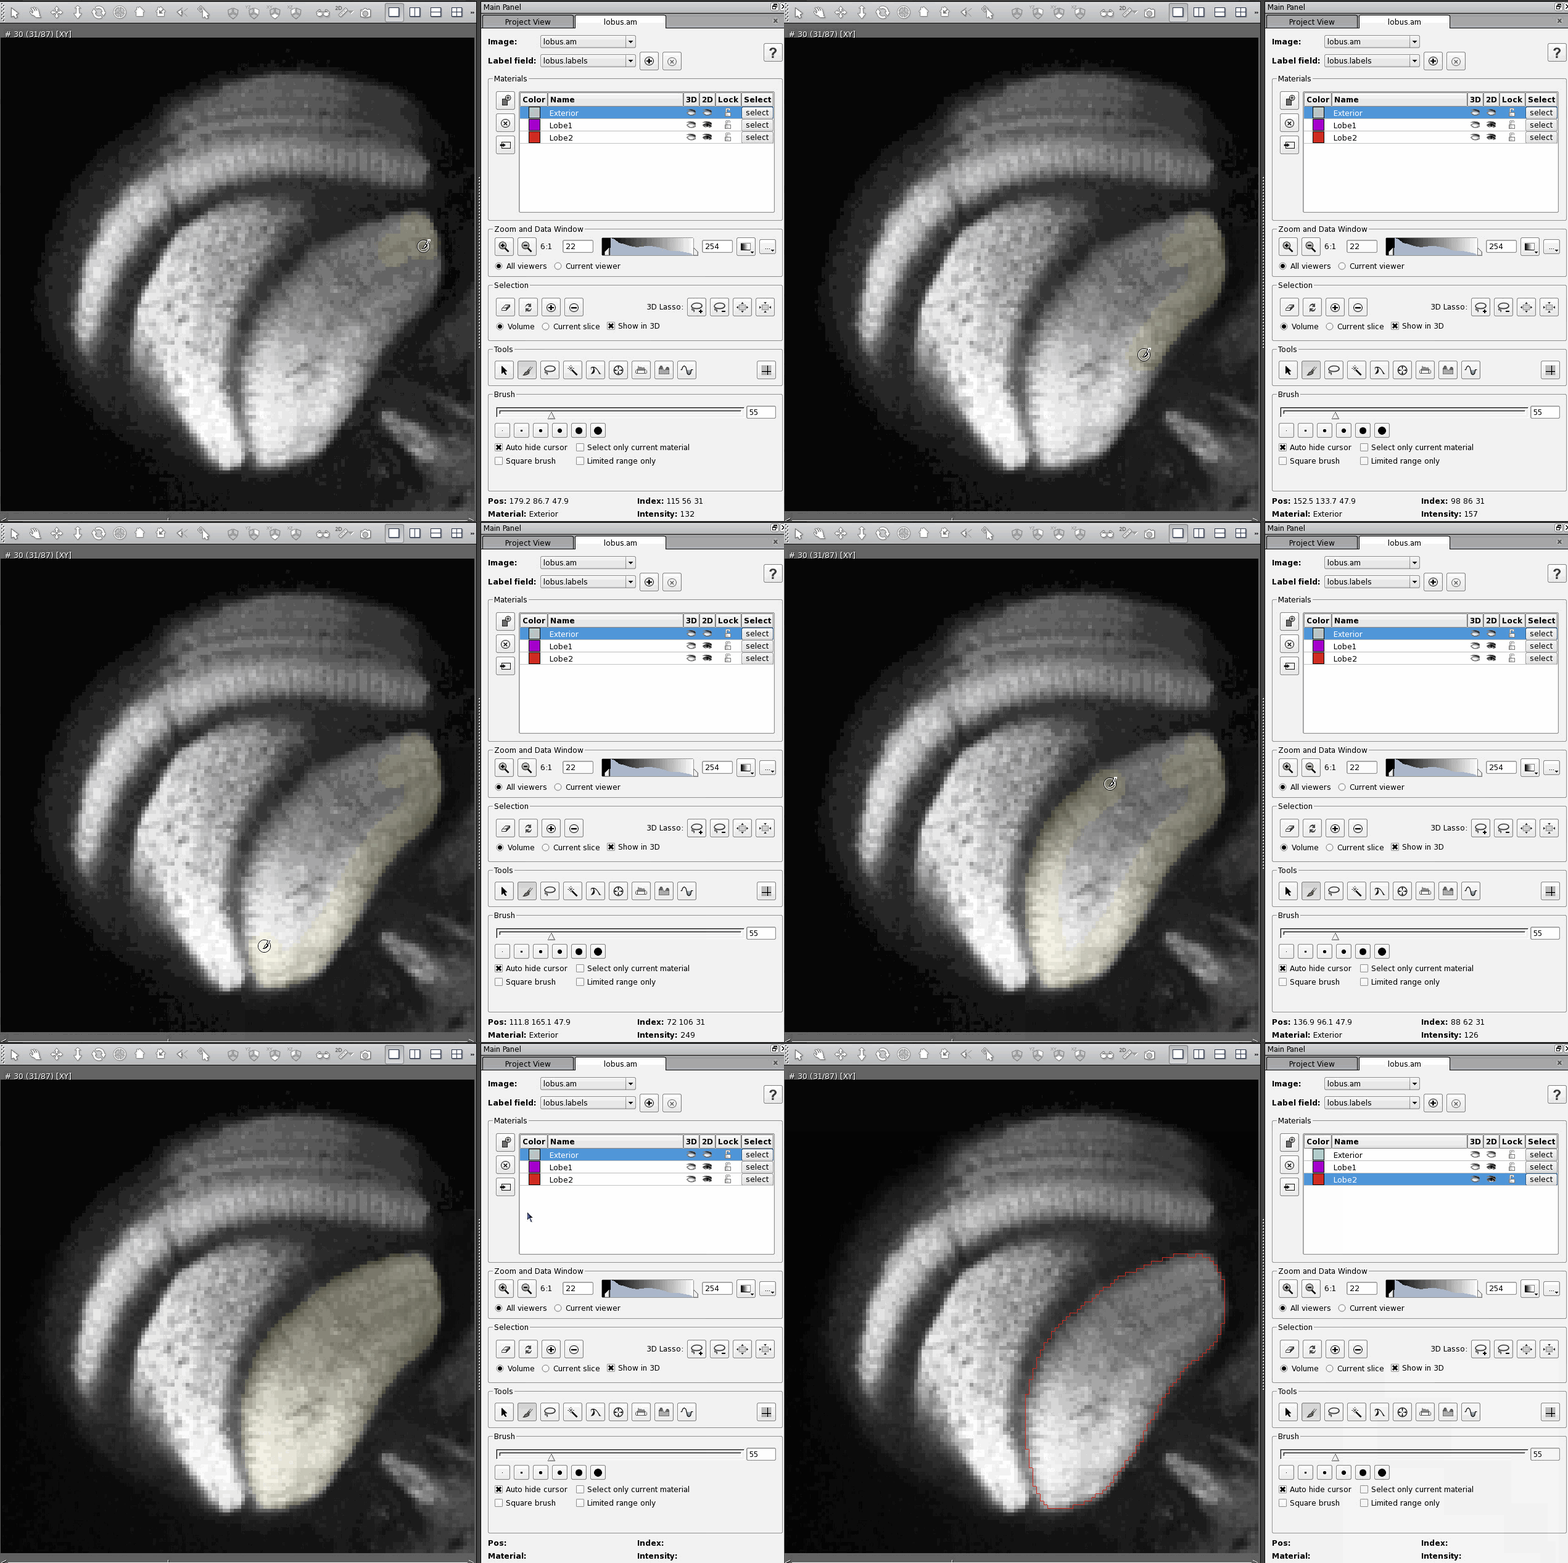
The most straightforward and least efficient way to add a region of an image to a material is to select that region using whichever tool is most appropriate (in these examples I use the brush tool, which is the most straightforward tool, but again the least efficient) and then click on the Add button in the Selection section of the Segmentation Editor. Here's what that looks like:

There are two hot keys that are supposed to do the same thing, "A" and "Ctrl +". The trick is, neither works in exactly the same way. Once I figured out the differences between them it was quite useful, because now I can use whichever Add function best suits my needs at the time. But it was confusing to figure out.

Pressing "Ctrl +" adds the selected part of the image to the material, but leaves it selected. You must then remember to unselect the region manually using the Clear button in the Selection section of the Segmentation Editor.

That means that, if you then select a region that you want to add to a different material, say Lobe1, and then go to add your new selection to Lobe1, you will add both selections to Lobe1 unless you remember to unselect your first selection.

Using the "A" key to add a selection to a material is even more tricky. It only works if you've already added at least one selection to the material since editing any other material. So, practically, the "A" key will only add a selection to the material if the last thing you did was add (or subtract) a selection to the same material. Furthermore, where that previous selection was matters, and depends on your current settings. In the Selection section of the Segmentation Editor, if the button "Volume" is selected, then the previous selection you added could have been on any slice.

However, if the button "Current Slice" is selected in the Selection section of the Segmentation Editor, then the previous selection added to the current material (in this case, Lobe2) must have been in the current slice for the A hot key to work. 

The "-" hot key for subtracting a selection from the current material has the same sort of funny restrictions as the "A" hot key.

If you have any suggestions, feedback, or questions about Amira/Avizo, please let me know.

Trouble-shooting Avizo (and Amira by extension)

Some of my work involves dealing with 3D images, either CT scans, MRI scans, or z-stacks from a confocal microscope. To analyse these images there are a variety of tools available but the industry standard seems to be Amira. Amira is an incredibly powerful piece of software not just for analysing 3D images, but also for editing them and making them look pretty for figures and presentations. Unfortunately, it comes with the kind of price tag you'd expect. As an academic user, I'd be able to purchase Amira at half price, about $5000 AUD, before taxes and extensions. For my work, I'd probably ultimately need at least the quantification+ extension, and possibly the neuro and large data set extensions as well.

Fortunately, I've been able to avoid this insurmountable expense through collaborations. I collaborate with biologists, neuroscientists and computational wizzes at Monash University and the University of Queensland. Because I am a staff member at Monash, I've been able to access the MASSIVE remote desktop. Through this desktop I have access to Amira, almost. MASSIVE does not have a licence for Amira. Instead they have a licence for Avizo. Avizo, to my understanding, is the same program as Amira, with a different skin. Amira is geared towards the life sciences, while Avizo is geared towards the physical sciences and engineering, but they both ultimately do the same thing.

Since I have access to Avizo but not Amira, I've been using Avizo for things that Amira's really meant for. Furthermore, as far as I can tell (and I've done some sleuthing), I'm the only person at the Australian National University using Amira/Avizo (side note: if you're at ANU and use either of these programs, please let me know!) That means, though I have support from experts at the University of Queensland and Monash, I've largely been on my own in figuring out how to use Avizo/Amira. Usually, when I have problems figuring out how to use software, Google is my saviour, however I've found the online resources for troubleshooting Avizo/Amira woefully inadequate (again, if you know of good online resources for this, please let me know!)

As I've been learning to use Avizo/Amira, I've encountered quite a few challenges, which I've mostly solved through trial-and-error, with some desperate e-mails to experts. Since I haven't been able to find these solutions online, I thought I'd put them here in a series of posts, so that the next desperate person might solve these problems without wasting quite as much time banging their head against a keyboard as I have. I'd like to note that these problems are beginner problems and will look very simple to the advanced (or even just regular) Avizo/Amira user, but they were quite frustrating at the time!

First, I must say that the Amira training manual is very useful for learning both Amira and Avizo, and is very easy to use. I've done Chapters 2 and 7, which teach the basics (including segmentation, the tool I use most) and animations, respectively. The troubleshooting I describe will assume knowledge of Chapter 2, sections 2.1-2.5, which cover loading an image, viewing an image, and segmenting an image. The reason I use the Amira training manual rather than the Avizo training manual is that the Amira manual uses a neuroscience example (a bee brain) and neuroscience is what I do, so it's much easier to directly translate the examples to my work.

In addition to the steep learning curve involved in learning to use Amira/Avizo, there are two additional sources of confusion that I've found. First, there are some things that are different between Amira and Avizo which can make the Amira training manual difficult to follow in Avizo. I'll cover the issues I've found later. Second, I'm a Mac/Linux user, and I think that there are some bugs in Amira/Avizo that are particular to these two systems. Here's the first one:

Using the "hot keys" of the Image Segmentation Editor in OS X or Linux

First things first, and this might seem simple, but it was really confusing at the time. Any of the "hot key" commands (what Avizo/Amira calls keyboard shortcuts) that use the Control key on PCs STILL use the Control key on Macs. This is despite the fact that every other program I've ever encountered uses the Apple/Command key in place of the Control key for keyboard shortcuts on Macs. Get used to it, Mac users, it's the Control key in Amira/Avizo. Here is a PDF of the Segmentation Editor's hot keys.

Second, as far as I can tell, not all the hot keys actually work (at least for me, using OS X and Linux). I made this table as a guide for myself so I would know if a key command normally works or if I'm going nuts. Most of them do work for me and I recommend going through each of them one-by-one, just to see what they do. If I'd done that two years ago, I'd have saved a lot of time!

The issues I'm going to go through on this blog are similar to this one. They will be very basic to the regular or advanced Amira/Avizo user, but boy would I have been overjoyed for someone to have told me these things when I was learning! If you have a particular issue with Amira or Avizo, please let me know and I will help if I can.